
Hello everyone!
It's been a busy old time at Sew Over It HQ recently - we're been celebrating the release of our newest girl in town, Joan. Have you picked up the Joan Dress pattern yet?
We've loved the response and seeing your dresses come together. Have you made one? Don't forget to show us on Facebook, Twitter or Instagram! We'd love to see! (And you can check out our Joan Dress Pinterest board for some Mad Men inspiration!)

On the whole, once you have the fit tweaked for your body, the Joan Dress pattern is fairly straightforward to sew, but there are some trickier parts which we thought we would go over in the sewalong for you. The first part that we're going to cover is creating and attaching the neck tie collar and the lining, and then tomorrow we'll show you how to sew the kick pleat all beautifully and neatly.
So let's get sewing!
The first thing we're going to do is create the neck tie collar. (By this point you will have sewn the darts and constructed the bodice and skirt, inserted the sleeves, sewn the bodice and skirt together and put in the invisible zip - all caught up?)

Onto the neck tie!
With right sides together, fold the right hand side neck tie piece (F) in half lengthwise and with the open edge at the bottom, pin the right hand side of the tie up to the first notch. Pin the very short left hand edge as well to secure.

Repeat these steps for the left tie piece (G), which is slightly shorter.
On both pieces F and G, and using a 1.5cm seam allowance, stitch from the right hand side up to the first notch, remembering to backstitch at the beginning and end. Stitch the pinned left hand side short edge on both pieces.


To give a beautifully neat finish on the tie when it is attached to the dress, make a little diagonal snip into the seam allowance at the end of your line of stitching.

Trim down the seam allowances to 5mm, leaving the unstitched part of the tie untrimmed. Cutting away the corners will give you a better finish when you turn the ties the right way out.

Turn both tie pieces right sides out and press.

To keep everything in place when you pin the tie to the dress, at this stage it is a good idea to tack the open edges of the tie closed. Use a long stitch length and remember to sew within the 1.5cm seam allowance.
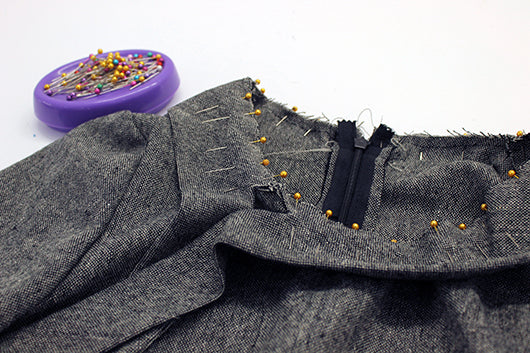
Now it's time to pin the ties to your dress. Matching the notches on the ties to the notches on the left hand side of the bodice, pin the ties in place all around the neckline.

The ends of the ties should sit neatly at either side of the zip. Tack the ties in place with a long stitch length within the seam allowance.
Once the ties are securely in place, it's time to attach the lining. To prepare the lining opening, press each side of the centre back seam over by 1.5cm, wrong sides together, stopping at the top of the kick pleat.
At this stage in the construction the ties are going to be sandwiched in between the right side of the dress and the right hand side of the lining.
At the neckline, with the lining inside out, pin the lining and the dress together. Make sure that the centre back opening of the lining remains pressed in place, and pin it to secure. To ensure that you achieve a smooth finish with no puckers, it's a good idea to use lots of pins at this stage!
With a 1.5cm seam allowance and starting at one open edge of the centre back, stitch the lining to the dress all around the neckline, ending at the other open edge. Give the neckline a good press, pressing the seam allowance as much as you can towards the lining.

To help the neckline sit perfectly, trim the seam allowance down to 5mm all the way around.

Getting as close as you can to the line of stitching without snipping into it, clip into the seam allowance at 1cm intervals around the neckline.

Open the dress so it is the right way out and press the seam so that the lining sits in place on the inside of the dress.

Then, to secure it fully in place, understitch the lining and seam allowance together, ensuring that you only stitch the lining and not the outside of the dress. Your stitching line should be about 2mm away from your existing seam.

Give the neckline another good press and that's this part of your dress finished!
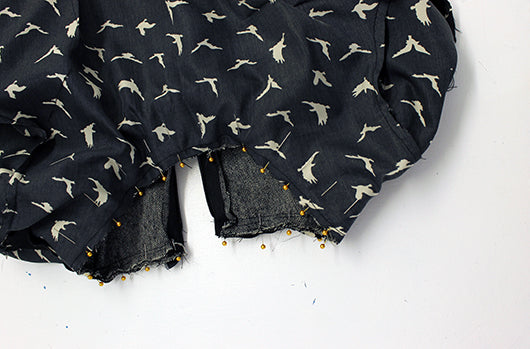
We are going to bring the second part of this sewalong, the kick pleat and hem, tomorrow so if you want to get ahead in the mean time you can get to work hand stitching the lining to the dress at the sleeve openings.
Happy sewing and we'll see you for the rest of the Joan Dress sewalong. For those of you who want to join in but don't have your pattern yet, you can get your very own copy here!